

We are thrilled when clients seek us out to create beautifully designed and highly functional websites. However, we often find ourselves spending a lot of time to convince clients that creating compelling content is a critical component of finding and growing a highly engaged audience. Once they are on board, they begin to realize that creating great content isn’t always easy and can take a lot of time and effort.
It is disheartening to see what can happen when a link is shared on Facebook without proper meta tags, which often results in the wrong image or description being displayed. Not only is this sloppy, but it relies on users to manually correct that information (if the particular social media platform even allows for that flexibility). Worse, your audience is unlikely to take the time to make those same adjustments when they are sharing your content. The solution to this is to leverage HTML meta tags to tell and tailor your story to each social media platform.
A Real Life Example
Imagine you show up at a dinner party. You look around and discover that you don’t know anyone there! You keep scanning the unfamiliar faces when someone bumps into you and strikes a conversation. Inevitably, the other person asks you “so, what do you do for a living?”
Such a simple question, but you probably have anywhere from 2-5 canned responses to pick from depending on the background of the person that asks. If you had an inkling that the person worked in a similar industry or knows of the company you work for, you might provide a somewhat detailed answer going into specific nuances that they might understand and appreciate. On the opposite end of the spectrum, you might overwhelm someone that has no frame of reference. Here you are more likely to give a generic answer, which is why I simply tell my mom “I work with computers” and that’s sufficient to keep the conversation going.
In short, different people get different answers based on what will best support the conversation with that person or audience. We now need to apply those same principles for your content as it is interacted with on different social media platforms.
Part 1: Creating Your Sharing Strategy
Before we discuss the mechanics, it’s important to review your goals for each social media platform. Similar to the dinner party analogy, there are a variety of factors that you need to consider when deciding on what to communicate.
While the following is an overly simplistic breakdown of LinkedIn, Facebook, and Twitter, it will reinforce the need to tailor the messaging to each platform. Typically, Linkedin is geared towards conversations relating to careers, networking, business opportunities, and etc. Facebook started primarily as a way to connect with friends but has rapidly evolved into a mix that depends greatly on how you’ve been using it and what types of connections you already have. Twitter is based on real-time communication and information sharing.
It’s possible to create a piece of content that is useful to share across all 3 platforms at the same time, but it’s unlikely that it’s appropriate to present the content in the same way due to the different audiences and expectations on each platform. In short, posting an adorable picture of my two and a half-year-old daughter is encouraged on Facebook, arguably not something I would do on Twitter, and something I would never, ever do on LinkedIn.
Part 2: The Mechanics
If you’ve never built a website before, it’s unlikely that you’ve peaked under the hood to see the guts of an HTML page. If you’d like to get a very quick overview, here is a basic tutorial to get started. And if you really want to take a deep dive, here’s a comprehensive overview on Wikipedia.
Traditionally, when you share a link to the social media outlets, each platform does its best job to scrape the page’s HTML and try to extract the pertinent details. In general, getting the title of the page is a no-brainer, but the description can be messed up in a variety of ways. Sometimes it will pull the wrong description or give up and show nothing at all. Twitter’s character limit can also cause a truncation that can either change the meaning or not accurately describe the page.
Picking an appropriate image can often feel like a game of Russian roulette. While you may expect the platform to pull an image from within the article, it will sometimes pull an image from a completely unrelated part of the page. Unfortunately, this can not only harm the quality of the share result but sometimes the two juxtaposition can result in an unappealing or inappropriate result. Just imagine an article on depression pulling an image of a specific person’s picture and you may be setting the reader up with the wrong expectation.
This is where meta tags come in. Here we want to provide additional information to essentially tell the different platforms the specific information and media we want it to use instead of having them guess. For example, Facebook uses a protocol called Open Graph, which contains a specific subset of meta tags that live in the head region of the HTML page that is used for share results on their platform. Twitter has its own set of meta tags that not only let you specify different information, but they also allow you to specify which style of share you would like to use (photo, video, standard, etc). And finally, Linkedin leverages the Facebook OpenGraph meta tags, so you can’t quite delineate the message between the two. Although, it is probably only a matter time before Linkedin creates their own version such that you can specify and tailor it to be a different introduction than Facebook.
Here’s a sample of the 9 lines of code we’ll be using to target our message.
<meta name="title" content="Page Title for Search Engines Results | Website Name" />
<meta name="description" content="Page Description for Search Engine Reults" />
<meta property="og:title" content="Page Title for Facebook" />
<meta property="og:description" content="Page Description for Facebook" />
<meta property="og:image" content="https://www.sitename.com/image-for-facebook.png" />
<meta property="twitter:card" content="summary" />
<meta property="twitter:description" content="Page Description for Twitter." />
<meta property="twitter:title" content="Page Title for Twitter" />
<meta property="twitter:image" content="https://www.sitename.com/image-for-twitter.png" /><
If you’re using a CMS like Drupal 8, adding these values to any node page is very straightforward. Simply install the metatag module along with the OpenGraph and Twitter submodules. Then visit the configuration menu located at /admin/config/search/metatag. There you can specify the default global values and tokens for each of these meta tag options. You can then override these values on a per node basis by visiting the node edit screen and navigating to the meta tags section.
It’s worth noting that there are more meta tags available that can be used to specify content attributes ranging from a video URL to its geographical location (i.e. longitude and latitude). Here’s just one list to emphasize the quantity and variety of tags available.
Part 3: The Outcome
Let’s use a real example from the NEWMEDIA blog. Several months ago, I published an article titled PCI Compliance & Drupal Commerce: Which Payment Gateway Should I Choose? Given the technical nature of the article for both developers and businesses, LinkedIn and Twitter would be the most appropriate place to share this page.
Without any metadata specified, the share result on Twitter is fairly bland. Here’s a quick screenshot showing it.
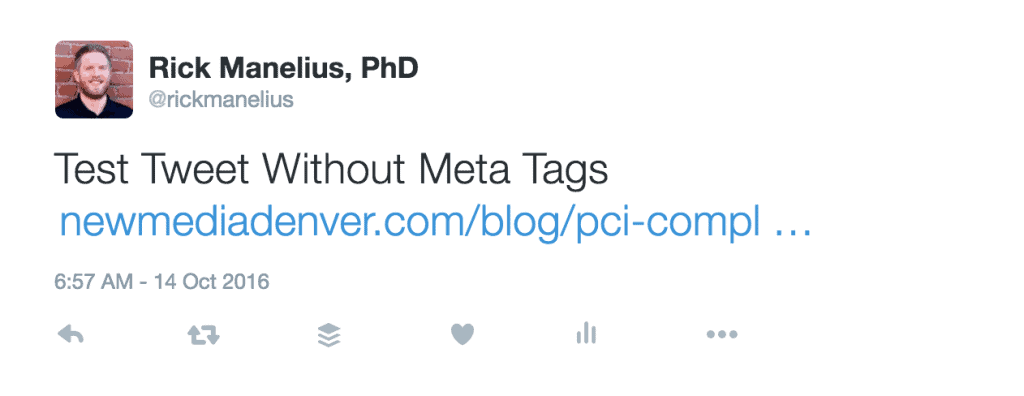
Figure 1: A tweet containing a link that lacks HTML Meta Tags for Twitter.
Alternatively, I can provide a very tailored title, image, and description that is far more likely to get someone’s attention and provide them with an accurate representation of the article itself.
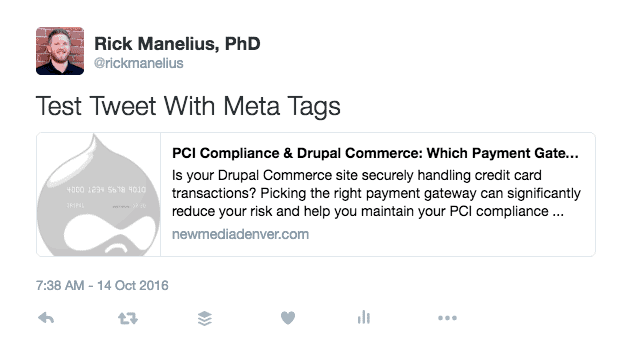
Figure 2: A tweet containing a link with HTML Meta Tags for Twitter.
It’s important to note that these changes are more than just simple cosmetics. The share result is now taller because the images get more real estate and you’re able to leverage the full length of the description field. Both of these changes makes the tweet stand out more. If I had a video, I could put that in as well, allowing me to have an additional opportunity to communicate with a potential reader before they left Twitter. In short, I’ve dramatically improved my odds of reaching the audience.
Finally, we need to change the message on LinkedIn. By editing the “og:description” field, we could say something along the lines of “Keep your customer’s credit card data safe while meeting your PCI compliance obligations for your Drupal Commerce site by using these recommended payment gateways.” This way we are focusing more on a businesses need to protect their customers by choosing the appropriate gateways instead of appealing strictly to a security minded developer on Twitter.
Summary
As social media platforms continue to become a dominant traffic source for your content, it becomes even more important to put in the small amount of additional effort to ensure your story can connect with each audience. Through the proper use of metadata, you can easily achieve this goal with your existing content as well as make this a part of your editorial process moving forward.
PS. You can use the following preview tools to test what content will look like on Twitter and Facebook.

